X300 6 Liter Oil Cooler Hoses-An Alternative to OEM
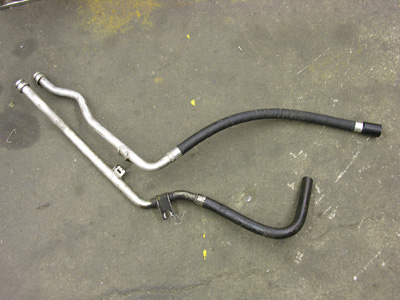
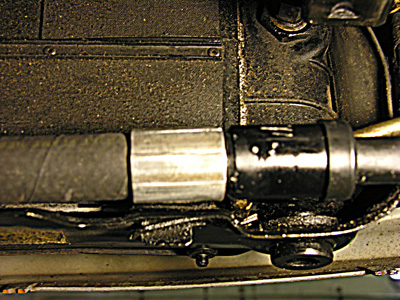
After having my 1995 X300 V12 Jaguar towed into the shop three times for blown oil cooler lines, I had had enough. I decided to redesign the system. In the process, I discovered a much easier and still effective alternative. The OEM set up uses aluminum pipe with thin walled rubber hose crimped into place. The picture to the left shows the stock hoses. The oil filter housing end has the pipes held on by a plate with o-rings sealing them. The other end that goes to the oil cooler has slip on fittings as a lot of manufacturers use. It is a rather large one and requires a sleeve release tool to be inserted to let it slip off. I found a piece of pipe, cut it in half and made the tool as none of the ones in my set were large enough. The one on the bottom has had the slide on sleeve removed. Original lengths are 21" for the upper one which is the shorter of the two and connects on the left side of the cooler. The one with the 90 degree elbow is 28.5". Getting them out of the car is a job in itself but can be done without taking the engine out of the car. Once out of the car, the next job is to take the hoses off of the pipes. Using a high speed wheel cutter, I cut the crimp off down to the rubber. When I was most of the way through, a screwdriver inserted in the cut will twist it off. The hose is soft enough to then just pull off.
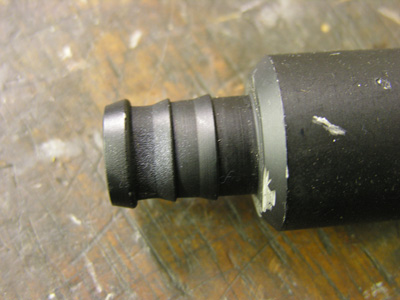
Be careful no to scratch or cut the barbs on the pipe or end fittings. The picture on the right is the barb fitting without the hose on it. Note that the end barb is larger than the other two. The original crimp did not cover the large barb but went up to it so the hose had to make a sharp transition. The original hose is made by AeroQuip which is a quality name brand. I guess it is not up to this application. The results of one of the hoses blowing can be rather devastating if not noticed immediately as all of the engine oil is quickly gone. I was lucky in that it was caught in time. There are o-rings inside of this fitting. When you have it off, it is a very good time to replace them. Most auto parts stores should carry them. There are two per fitting and are the same size.
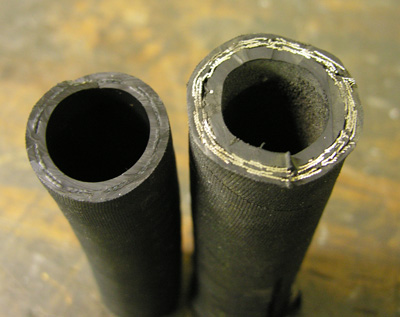
The picture on the left shows the new hose on the right compared to the original on the left. The new hose is used for heavy duty hydraulic applications and is steel reinforced. The hose shop says that they use this hose for high pressure oil useage that far exceeds the pressure a V12 engine will ever see. It has to be cut with a high speed cutter because of the steel. The original hose on the left is cloth reinforced and very flexible. These hoses carry all of the engine oil through the cooler under normal engine operating pressure so a leak of any size can get bad in a hurry. The longer hose that originally has a 90 degree bend in it will need to be 4" shorter (24.5" long) than the original as the heavy duty hose does not bend as easily. There is still plenty of room for the bend without interfering with anything. Only one of the two hose clamps at the bottom of the radiator are used with the new hose.
NOTE: these hoses are also used on the 1994 XJ12 but the aluminum pipe is slightly different. Same hoses and procedure.
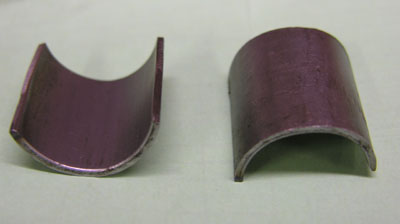
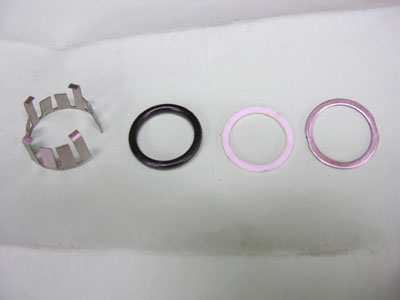
The inside diameter of the tool should be .875" or 7/8" when put together to make a circle. The pipe I used was actually larger than the 7/8" pipe so I had to make the curve match. This was done rather easily by finding a deep socket the correct diameter and tapping with a hammer until the curve matched. This tool will then slide in and release the clip that holds the end on the oil cooler. Inside the slip on end is a spring clip, two rubber o-rings, and a stack of metal and nylon spacers. Pay attention to the order they are stacked if you take this apart to replace the o-rings so as to put it back together properly. Below is a picture of the internal pieces in the quick release. These are not all of the pieces but rather one of each of them. Note that the metal washer has two flat sides so as to fit into the coupling. The spring clip has 8 "feet" that need to be pressed away from the tube to release the coupling. That is what the special tool pushes back when taking off the hoses.